
At ScaleReal, We use the Github Actions workflow for CI/CD purposes extensively. Normally, for authentication of GitHub workflow with a cloud provider, we have to give the credentials, these credentials are usually stored as a secret in GitHub to get our job done. But, having long-lived credentials is not a good security practice. So, instead of generating and hard-coding the credentials in GitHub, we can use short-lived credentials using OpenID connect.
Prerequisites:
- Basic concepts of how GitHub uses OpenID Connect (OIDC), and its architecture.
- Basic knowledge about creating Identity providers, and IAM services in AWS.
Create an identity provider in AWS
Follow these instructions to create and manage an IAM OIDC identity provider in the AWS Management Console.
- Open the IAM console using this link https://console.aws.amazon.com/iam/.
- In the navigation pane, choose Identity providers, and then choose Add provider.
- For Configure provider, choose OpenID Connect. -For Provider URL type this value — https://token.actions.githubusercontent.com
Note: The URL is case-sensitive. The URL must begin with
https://. The URL should not contain a port number. Within your AWS account, each IAM OIDC identity provider must use a unique URL.
- For the “Audience”: Use
sts.amazonaws.comif you are using the official action. - Choose to Get thumbprint to verify the server certificate of your IdP.
- (Optional) For Add tags, you can add key-value pairs to help you identify and organize your IDPs.
- Verify the information that you have provided. When you are done choose Add provider.
 Create an identity provider in AWS
Now we need to assign the IAM role to OIDC. So we have to create an IAM policy and IAM role for this as below.
Creating an IAM policy for web identity or OIDC
To create an IAM policy to work with your OIDC follow the below steps:
- Sign in to the AWS Management Console and open the IAM console at https://console.aws.amazon.com/iam/.
- Choose policies from the left navigation panel.
- Click on Create Policy.
- Depending on your use case you can create your custom policy. Here we are considering we need to fetch and upload some objects on the s3 bucket so the policy will be
- Then create the policy by giving the proper name to it.
Creating a role for web identity or OIDC
We have created the identity provider in the previous step now we will create an IAM role for a third-party Identity Provider (Federation).
- Sign in to the AWS Management Console and open the IAM console at https://console.aws.amazon.com/iam/.
- Click on Create Role.
- Choose the Web Identity role type.
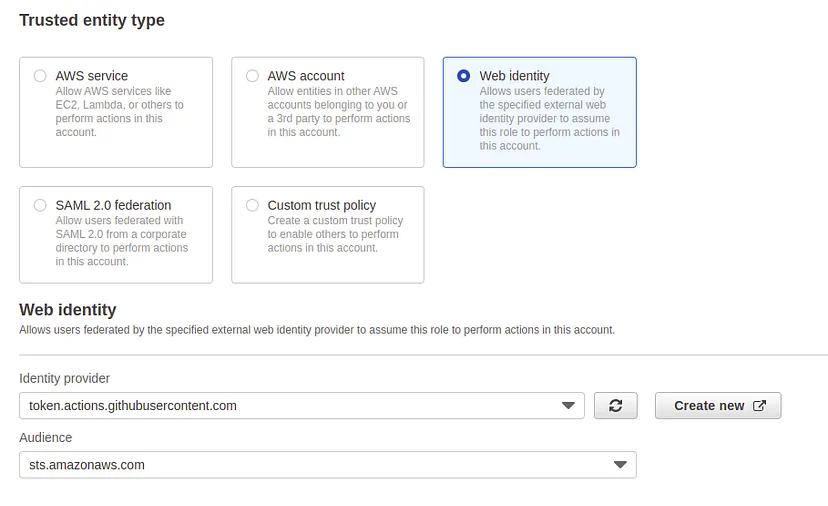
- Choose the identity provider for your role:
Here choose the identity provider that you have just created.
- Choose the audience from the drop-down as shown in the screenshot.
 Create an IAM role for web identity
- Click on the Next button.
- Choose the policy you have just created from the IAM policy attachment screen.
- On the next page give a name to the IAM role and a description if needed.
- Then in the Select trusted entities section click on edit and paste the below JSON code
Here in the above JSON, you can put your GitHub organization name and repo name in place of
"repo:<org_name>/<repo_name>:*"If you want to enable this OIDC setup for the whole organization the this will be"repo:myorg/*:*"If you want to enable this OIDC setup only for a specific repository then this will be"repo:myorg/my-repo:*"
- Then click on create role.
Now we have done with the AWS side set up so now we will see how to use it in the workflow.
The below workflow file shows how you will use the OIDC setup with GitHub.
- In the above example replace the <oidc_role_arn>value with the actual IAM role ARN that we have created and <session_name>with the name of the session.
So here we are! 😍 We have successfully completed the setup here. 😎
At Scalereal We believe in Sharing and Open Source.
So, If you found this helpful please give some claps 👏 and share it with everyone.
Sharing is Caring!
Thank you ;)