
Hey, there fellow Djangomers and Pythonistas,
At ScaleReal, we work extensively on Python/Django Applications and have built many highly scalable applications for various clients of ours.
While working on such apps it’s very important to understand the ins and outs of social logins.
So, In this article, we’ll learn about Social Logins, why we need them, how it works & how to implement them in Django. So, let’s dive in!
Here’s a list of everything which will be covered in this article:
- What is Social Login?
- Why do we need it?
- How does Social Login work?
- Package for implementing social login
- How to implement Google Social Login in your project?
- How to implement Facebook Social Login in your project?
What is Social Login? 🤔
A social login is a form of single sign-on using existing information from a social networking service such as Facebook, Twitter, or Google, to sign in to a third-party website instead of creating a new login account specifically for that website.
Why do we need it?

Social Login contributes to a more efficient form of user management. The concept of social login authentication involves creating a single sign-on for applications. This means that users can sign up for various applications or websites without repeatedly inputting their credentials.
The login credentials usually come from a social media platform like Twitter, Facebook, and more, which users can use to automatically input the required credentials. Thus, the process of user authentication will be cut short significantly for users.
How does Social Login Work?
Social login is a simple process that can be done in just a few steps:
- The user enters an app or site and selects their chosen social network. This usually takes the form of a social login button or “Sign in with [social platform]” links.
- The social network provider receives a login request and authenticates the user. At this stage, users need to accept the access permissions of the app or site.
- The user will get access to the site or app once the social provider has confirmed their identity.
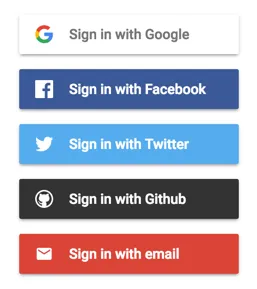 Sign in with social platform
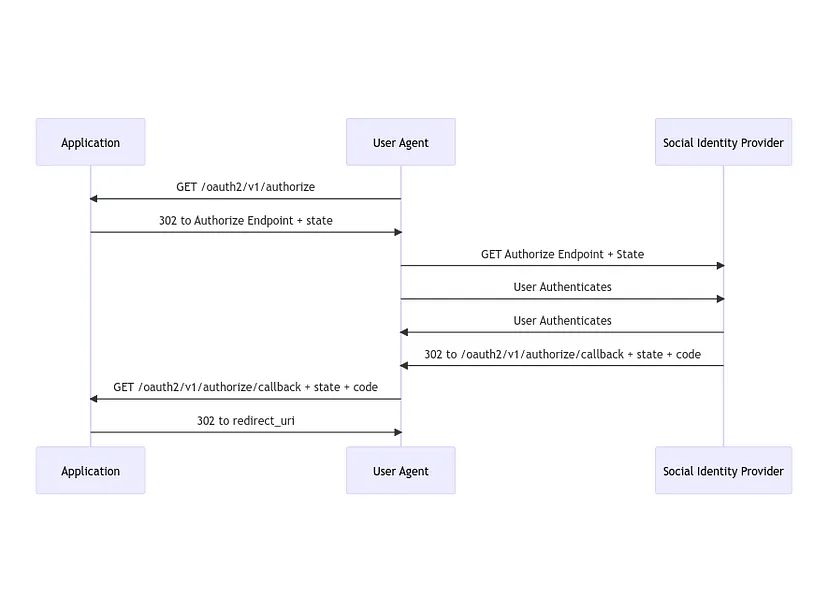 Social Login Sequence Diagram
If you’re new to OAuth or are hearing this term for the first time, then I recommend reading a bit about OAuth and then proceeding with this article so that you get a better understanding!
In a nutshell, OAuth is an open standard for access delegation, commonly used as a way for internet users to grant websites or applications access to their information on other websites but without giving them the passwords. You can read more about it in this article by auth0.
Package for Implementing Social Login
For the scope of this article, we’ll be proceeding with django-rest-framework-social-oauth2 package.
The aim of this package is to help set up social authentication for your REST API. It also helps set up your OAuth2 provider. Note that this package relies on python-social-auth and django-oauth-toolkit.
How to implement Google Social Login in your project?
- Create Django App
- Install the above-mentioned package using the following command pip install django-rest-framework-social-oauth2
- Add the following to your INSTALLED_APPS in settings.py
- Include social auth URLs in urls.py
- Add these context processors to your TEMPLATES
- You can then enable the authentication classes for Django REST Framework by default or per view (add or update the REST_FRAMEWORK and AUTHENTICATION_BACKENDS entries in your settings.py)
- Setup a new application:
- Go to Django admin and add a new Application with the following configuration:
- client_id and client_secret should be left unchanged
- user should be your superuser
- redirect_uris should be left blank
- client_type should be set to public
- authorization_grant_type should be set to ‘Resource owner password-based’
- name can be set to whatever you’d like
The basic installation is done, and you can now test the newly configured application.
Testing the setup:

Now, to use Google OAuth2 as the authorization backend of your REST API, your settings.py file should look like this:
You can test these settings by running the following command:
curl -X POST -d “grant_type=convert_token&client_id=<django-oauth-generated-client_id>&client_secret=<django-oauth-generated-client_secret>&backend=google-oauth2&token=<google_token>” http://localhost:8000/auth/convert-token
This request returns an “ access_token” that you should use with every HTTP requests to your REST API. What is happening here is that we are converting a third-party access token (<user_access_token>) to an access token to use with your API and its clients (“access_token”). You should use this token on each and further communication between your system/application and your API to authenticate each request and avoid authenticating with Google every time.
You can get the ID (SOCIAL_AUTH_GOOGLE_OAUTH2_KEY) and secret (SOCIAL_AUTH_GOOGLE_OAUTH2_SECRET) of your app at Google Developer’s Console and more information on how to create one here. For testing purposes, you can use the access token <user_access_token> from OAuth Playground.
How to implement Facebook Social Login in your project?
To use Facebook as the authorization backend of your REST API, your settings.pyfile should look like this:
You can test these settings by running the following command:
curl -X POST -d "grant_type=convert_token&client_id=<client_id>&client_secret=<client_secret>&backend=facebook&token=<facebook_token>" http://localhost:8000/auth/convert-token
You can get the ID (SOCIAL_AUTH_FACEBOOK_KEY) and secret (SOCIAL_AUTH_FACEBOOK_SECRET) of your app on Facebook Developer’s page. For testing purposes, you can use the access token <user_access_token> from here.
For more information on how to configure python-social-auth with Facebook visit the docs here.
Other Social Login Providers

There are a bunch of Social Login providers which are supported by this package. It includes the most popular ones such as Twitter, Github, LinkedIn, Instagram, etc. You can find a complete list of social backends supported by this package and how to configure them in the official documentation.
Bonus: You can find the boilerplate code for this article in this repo. It contains basic configurations to get started with Google and Facebook Social Login.
That’s it from my side devs! 👨💻
Thanks for reading! If you enjoyed reading this article, please click the 👏 button and share to help others find it! Feel free to leave a comment 💬 below. You can connect with me here!
Have feedback? Let’s connect here.
~Akash Shrivastava