
Welcome Python and Django enthusiasts, Django, a popular web framework for Python, provides an easy-to-use solution for implementing OAuth2 authentication.
What is Oauth?
OAuth (Open Authorization) is an open standard for token-based authentication and authorization on the internet. It enables third-party applications to obtain limited access to an HTTP service, either on behalf of a resource owner or by allowing the third-party application to obtain access on its behalf.
In this article, we will explore the basics of OAuth2, and how to implement OAuth2 in a Django application using the Django OAuth Toolkit library.
Working with OAuth2
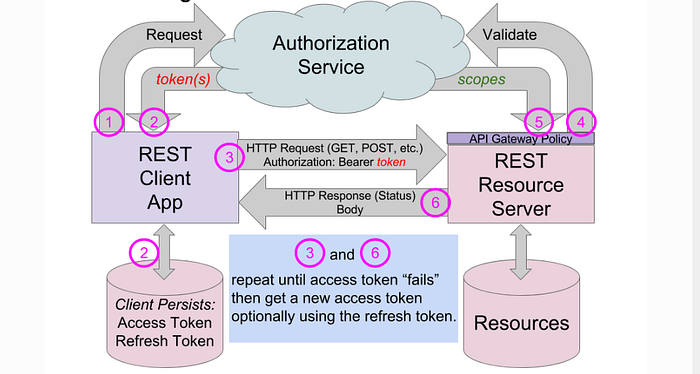
OAuth works by allowing a user to grant a third-party application access to their resources on a resource server, without having to share their login credentials (username and password). The process typically involves the following steps:
- The user requests access: The user wants to use a third-party application (client) that requires access to their resources on a resource server (such as photos on Flickr or data on Google).
- The user is redirected to the resource server: The user is redirected to the resource server (such as Flickr or Google), where they sign in if they are not already signed in.
- The user grants access: The resource server asks the user if they want to grant the third-party application access to their resources. If the user agrees, they grant access by clicking a “Grant Access” button or a similar mechanism.
- The resource server issues a token: The resource server then issues a token to the third-party application, which acts as a temporary authorization to access the user’s resources. The token contains information about the user, the third-party application, and the permissions granted by the user.
- The third-party application accesses the resources: The third-party application can then use the token to access the user’s resources on the resource server. The token is passed along with each request for resources, and the resource server uses it to verify that the request is authorized.
- The token can be revoked: The user has the option to revoke the token at any time, which would immediately terminate the third-party application’s access to its resources. This can be done through the resource server’s website or through the third-party application itself.
Let’s Begin in 👊🏼
We have already created a Django app you can find it here. We will refer to the same app for Django OAuth2 implementation.
Create a virtualenv and install django-oauth-toolkit with pip.
pip install django-oauth-toolkit
Project Configuration
Your Django project must be configured to use the library.
Add oauth2_provider to INSTALLED_APPS.
INSTALLED_APPS = [
    ...
    "oauth2_provider",
    ...
]
In your settings.py add the authentication classes for oauth2. You can add the list of available scopes for instance.
By defining the scopes in settings.py, they can be easily referenced in other parts of the application, such as in views, models, and other components, providing a consistent and centralized approach to authorization.
You can decide the scopes while generating an access token. You have to add one more parameter to the request body and it is scope
scope: read →Will be able to call data to fetch APIs
scope: write →Will be able to call update APIs
scope: groups →Will be able to call user groups based APIs
OAUTH2 = {
    "DEFAULT_AUTHENTICATION_CLASSES": .
        "oauth2_provider.contrib.rest_framework.OAuth2Authentication",
    ),
    "DEFAULT_PERMISSION_CLASSES": [
        "rest_framework.permissions.IsAuthenticated",
    ],
}

OAUTH2_PROVIDER = {

    "SCOPES": {
        "read": "Read scope",
        "write": "Write scope",
        "groups": "Access to your groups",
    }
Include the Django OAuth Toolkit urls in your urls.py choosing the url namespace you prefer.
from django.urls import path,include
urlpatterns = [
    ...
    path('o/', include('oauth2_provider.urls', namespace='oauth2_provider')),
    ...
]
Run migration to apply all the changes of a configuration of OAuth2.
 python manage.py makemigrations
 python manage.py migrate
Now, create a superuser, and remember your username and password.
python manage.py createsuperuser
It’s time to run your microservice.
python manage.py runserver
Let’s create a serializer.py file inside your app to serialize our models.
Register a view in views.py for UserDetails.
Now go to urls.py and configure some URL patterns for OAuth operations, fetching user details.
Let’s check it. After all, to get the OAuth Token, you must have an app registered.
Before that, you have to log in as admin(super user, you just created). Go to http://localhost:8000/admin/ and log in.
To register for an app, you have to go to http://localhost:8000/o/applications/
You will have a screen like this:
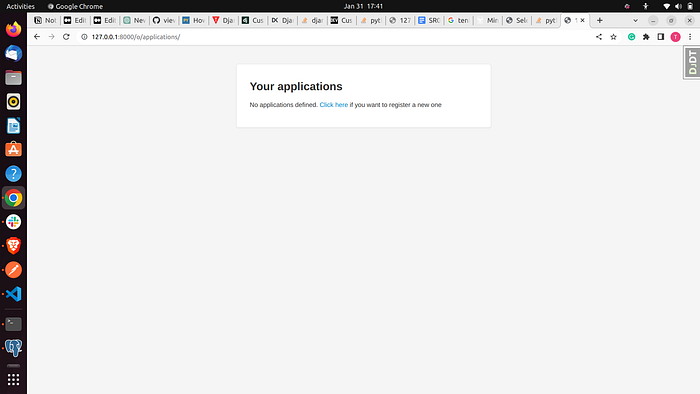
Click on the click here link to register a new app. It will take you to a form, Do fill it out like below.
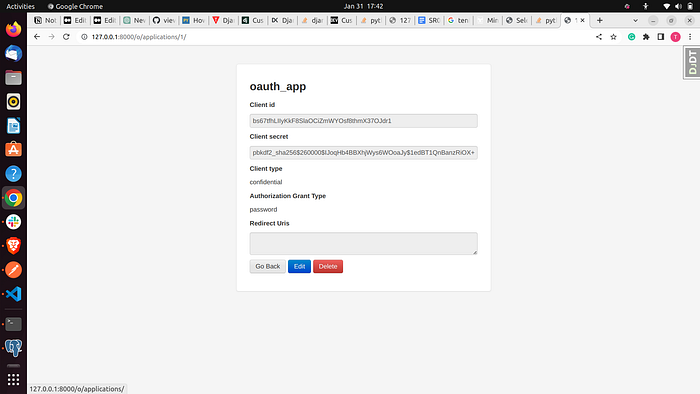
And save it. Now you have created an app for OAuth. And it’s time to generate your OAuth token.
For this, you will need to call the endpoint http://localhost:8000/o/token/ with basic authorization headers, username, password, and grant_type.
Here, I am using postman.
Basic Authorisation Headers
This username will be the Client id of the app, you just registered, and the password will be Client secret and fill out username, password, and grant_type just like below
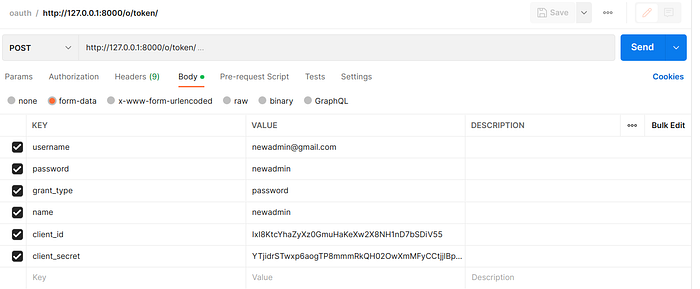
Once you call this API with exact credentials, you will get a response with an OAuth access token in it, just like below
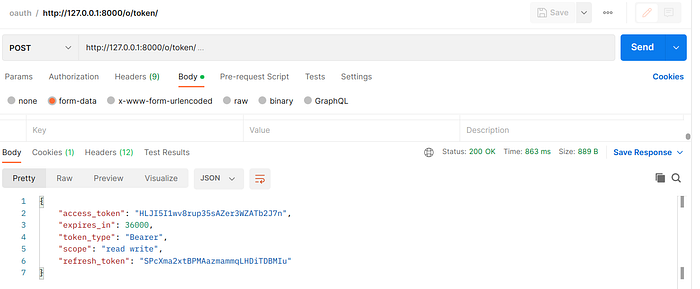
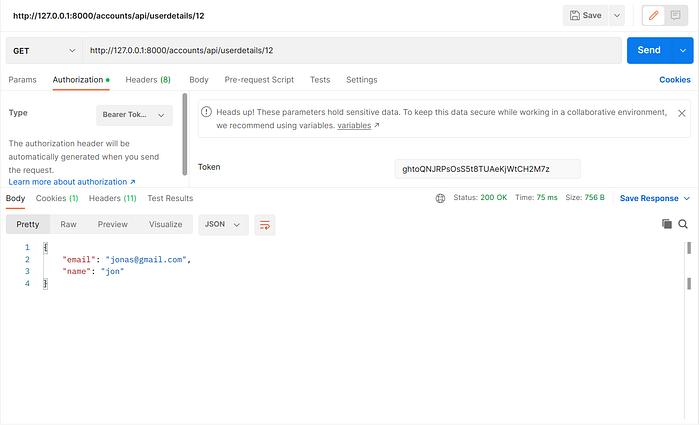
Now using this token as a bearer token authentication, you can APIs.
Example :
Here I have registered the serializer and view for getting UserDetails.
I’m going to call the user details API to get a detail of a specific user.
Oauth2 offers some features so that we can customize them ⚙️.
What if you want to change the default expiration time ⏱ of access and refresh the token? Let’s check how to do it 🤟🏻.
To change the default expiration time of access and refresh token you have to add the following in your settings.py file.
OAUTH2_PROVIDER = {
    ...
    'ACCESS_TOKEN_EXPIRE_SECONDS': 1200, # 20 minutes
    'REFRESH_TOKEN_EXPIRE_SECONDS': 3600, # 1 hour
    ...
}
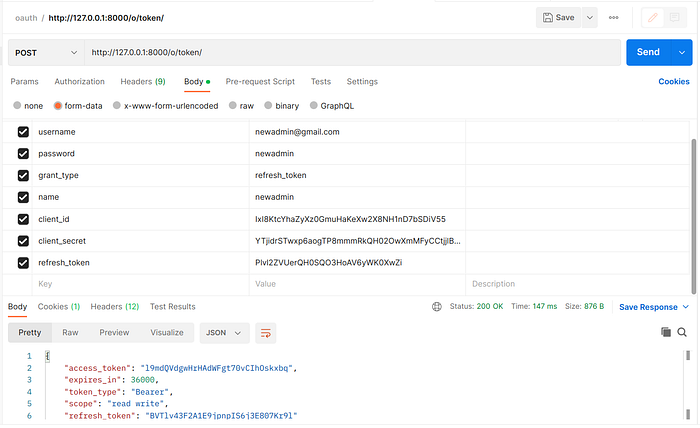
Although we can make use of a refresh token to get a new access token or If the refresh token is expired. For that, we have to pass grant_type as refresh_token in http://127.0.0.1:8000/o/token/ .
Limitations with Oauth2
- Complexity: OAuth2 can be complex to implement, especially for developers who are unfamiliar with the framework.
- Token Management: Token management can be complex, as OAuth2 requires tokens to be stored securely and revoked when no longer needed.
- User Experience: OAuth2 can lead to a poor user experience, as users are often redirected to a separate authentication page and may need to grant access multiple times.
- Third-Party Dependency: OAuth2 requires trust in third-party clients, which can be a security risk if the third party is compromised.
That’s it from my side folks 🧑💻, At the end of this series we will see the difference between Oauth2 and JWT.
Stay Tuned ✌🏼 🙋🏼♀️