History
We are implementing Single Sign-on(SSO) for one of our clients’ projects at scalereal. So, we compared various Single Sign-on(SSO) providers such as AWS-Cognito, Auth0 and Okta eventually we decided to use Okta as it was most suitable for our needs.
What is Okta ??
It’s a SaaS product that provides cloud software that helps companies manage and secure user authentication into modern applications, and for developers to build identity controls into applications, website web services and devices.
Before going ahead create a developer account on Okta
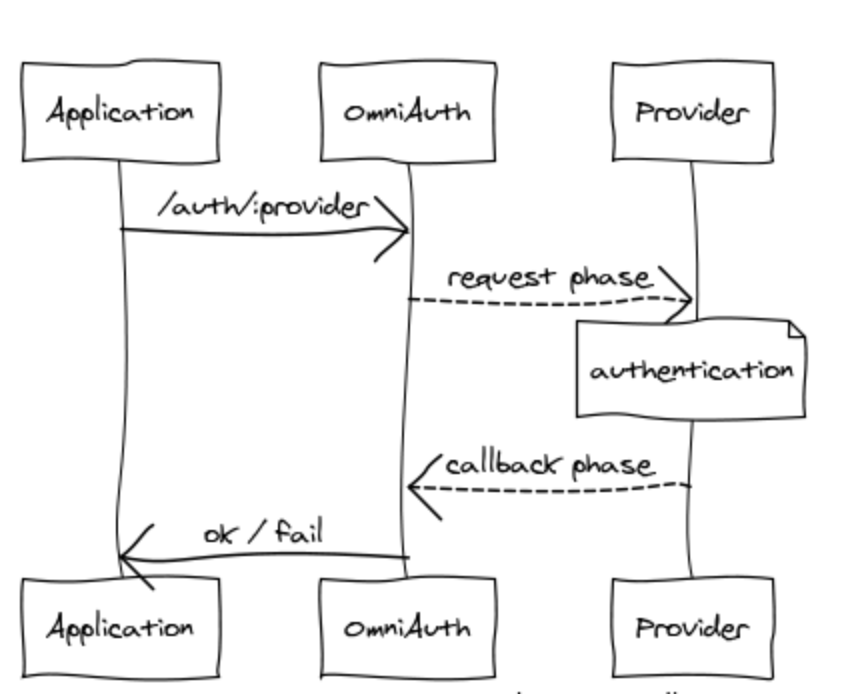
Basic flow okta with devise app
This is the basic flow of our rails app. we are moving step by step to integrate okata to a rails application
1. Create a Rails App with PostgreSQL or MySQL
rails new your_app_name -T -d postgresql
2. Add following gem to Gemfile
we are going to use omniauth-oktaoauth for Strategy to authenticate with Okta via OAuth2 in OmniAuth, activerecord-session_store for handling sessions and devise for handling login scenarios.
source 'https://rubygems.org' | |
git_source(:github) { |repo| "https://github.com/#{repo}.git" } | |
ruby '2.3.1' | |
# Bundle edge Rails instead: gem 'rails', github: 'rails/rails' | |
gem 'rails', '~> 5.2.4', '>= 5.2.4.2' | |
# Use postgresql as the database for Active Record | |
gem 'pg', '>= 0.18', '< 2.0' | |
# Use Puma as the app server | |
gem 'puma', '~> 3.11' | |
# Use SCSS for stylesheets | |
gem 'sass-rails', '~> 5.0' | |
# Use Uglifier as compressor for JavaScript assets | |
gem 'uglifier', '>= 1.3.0' | |
# See https://github.com/rails/execjs#readme for more supported runtimes | |
# gem 'mini_racer', platforms: :ruby | |
# Use CoffeeScript for .coffee assets and views | |
gem 'coffee-rails', '~> 4.2' | |
# Turbolinks makes navigating your web application faster. Read more: https://github.com/turbolinks/turbolinks | |
gem 'turbolinks', '~> 5' | |
# Build JSON APIs with ease. Read more: https://github.com/rails/jbuilder | |
gem 'jbuilder', '~> 2.5' | |
# Use Redis adapter to run Action Cable in production | |
# gem 'redis', '~> 4.0' | |
# Use ActiveModel has_secure_password | |
# gem 'bcrypt', '~> 3.1.7' | |
# Use ActiveStorage variant | |
# gem 'mini_magick', '~> 4.8' | |
# Use Capistrano for deployment | |
# gem 'capistrano-rails', group: :development | |
# Reduces boot times through caching; required in config/boot.rb | |
gem 'bootsnap', '>= 1.1.0', require: false | |
gem 'devise' | |
gem 'omniauth-oktaoauth' | |
gem 'activerecord-session_store' | |
gem 'figaro' | |
group :development, :test do | |
# Call 'byebug' anywhere in the code to stop execution and get a debugger console | |
gem 'byebug', platforms: [:mri, :mingw, :x64_mingw] | |
end | |
group :development do | |
# Access an interactive console on exception pages or by calling 'console' anywhere in the code. | |
gem 'web-console', '>= 3.3.0' | |
gem 'listen', '>= 3.0.5', '< 3.2' | |
# Spring speeds up development by keeping your application running in the background. Read more: https://github.com/rails/spring | |
gem 'spring' | |
gem 'spring-watcher-listen', '~> 2.0.0' | |
end | |
# Windows does not include zoneinfo files, so bundle the tzinfo-data gem | |
gem 'tzinfo-data', platforms: [:mingw, :mswin, :x64_mingw, :jruby] |
Then Run command bundle install
3. Install Devise
$ rails generate devise:install
At this point, a number of instructions will appear in the console. Among these instructions, you’ll need to set up the default URL options for the Devise mailer in each environment. Here is a possible configuration for config/environments/development.rb
config.action_mailer.default_url_options = { host: 'localhost', port: 3000 }
Now, create a model rails generate devise User Add few columns to users table,
rails g migration AddOminiauthToUsers provider:index uid:index
Before migrating database, create a table active_record session migration
rails g active_record:session_migration
Great, we added all the necessary things, Now fire rake db:migrate
4. Build Authentication
Next, create a config/application.yaml file to populate all necessary environment variables.
bundle exec figaro install
Once your Okta account has been created, you’ll need to copy some Okta values into environment variables for Rails to use. Edit the newly generated config/application.yml and add the following values from your Okta tenant.
require 'omniauth-oktaoauth' | |
Devise.setup do |config| | |
config.mailer_sender = '[email protected]' | |
require 'devise/orm/active_record' | |
config.case_insensitive_keys = [:email] | |
config.strip_whitespace_keys = [:email] | |
config.skip_session_storage = [:http_auth] | |
config.stretches = Rails.env.test? ? 1 : 11 | |
config.reconfirmable = true | |
config.expire_all_remember_me_on_sign_out = true | |
config.password_length = 6..128 | |
config.email_regexp = /\A[^@\s]+@[^@\s]+\z/ | |
config.omniauth(:oktaoauth, | |
ENV['OKTA_CLIENT_ID'], | |
ENV['OKTA_CLIENT_SECRET'], | |
:scope => 'openid profile email', | |
:fields => ['profile', 'email'], | |
:client_options => {site: ENV['OKTA_ISSUER'], authorize_url: ENV['OKTA_ISSUER'] + "/v1/authorize", token_url: ENV['OKTA_ISSUER'] + "/v1/token"}, | |
:redirect_uri => ENV["OKTA_REDIRECT_URI"], | |
:auth_server_id => ENV['OKTA_AUTH_SERVER_ID'], | |
:issuer => ENV['OKTA_ISSUER'], | |
:strategy_class => OmniAuth::Strategies::Oktaoauth) | |
config.reset_password_within = 6.hours | |
config.sign_out_via = :delete | |
end |
Once you are done with adding Okta environment variables, let’s add it to our Devise. Edit devise.rb and configure omniauth authentication
OKTA_CLIENT_ID: "YOUR-CLIENT-ID" | |
OKTA_CLIENT_SECRET: "YOUR-CLIENT-SECRET" | |
OKTA_ORG: "YOUR-OKTA-ORG" | |
OKTA_DOMAIN: "oktapreview" | |
OKTA_URL: "YOUR-OKTA-ORG-URL" | |
OKTA_ISSUER: "YOUR-OKTA-ISSUER-URL" | |
OKTA_AUTH_SERVER_ID: "YOUR-AUTH-SERVER-ID" | |
OKTA_REDIRECT_URI: "http://localhost:3000/users/auth/oktaoauth/callback" |
Now we should able to connect Devise to Okta.
5. Make Application Working
So up-to this we configure devise with Okta, Now Let’s make our application working.
Create users/ominiauth_callbacks_controller.rb
class Users::OmniauthCallbacksController < Devise::OmniauthCallbacksController | |
def oktaoauth | |
# You need to implement the method below in your model (e.g. app/models/user.rb) | |
@user = User.from_omniauth(request.env["omniauth.auth"]) | |
if @user.save | |
session[:oktastate] = request.env["omniauth.auth"] | |
else | |
print(@user.errors.full_messages) | |
end | |
if @user.present? | |
redirect_to user_path(session[:oktastate][:uid]) | |
end | |
end | |
end |
In this, we are handling sessions and handling env[“omniauth.auth”] which is having Okta credentials.
And then add method from_omniauth in user.rb model
class User < ApplicationRecord | |
# Include default devise modules. Others available are: | |
# :confirmable, :lockable, :timeoutable and :omniauthable | |
devise :omniauthable, omniauth_providers: [:oktaoauth] | |
def self.from_omniauth(auth) | |
User.find_or_create_by(email: auth["info"]["email"]) do |user| | |
user.provider = auth['provider'] | |
user.uid = auth['uid'] | |
user.email = auth['info']['email'] | |
end | |
end | |
end |
Make sure you are adding Devise with omniauthable with provider oktaoauth
Edit routes.rb like below
Rails.application.routes.draw do | |
get 'sessions/new' | |
get 'sessions/create' | |
get 'sessions/destroy' | |
get 'home/index' | |
# devise_for :users | |
devise_for :users, controllers: { omniauth_callbacks: 'users/omniauth_callbacks' } | |
# For details on the DSL available within this file, see http://guides.rubyonrails.org/routing.html | |
root to: "home#index" | |
resources :users | |
end |
Basically I create home_controller.rb for root index,
class HomeController < ApplicationController | |
before_action :user_is_logged_in? | |
def index | |
end | |
end |
well user_is_logged_in? the method is missing ?? write that method in application_controller.rb
class ApplicationController < ActionController::Base | |
protect_from_forgery with: :exception | |
def user_is_logged_in? | |
if !session[:oktastate] | |
redirect_to user_oktaoauth_omniauth_authorize_path | |
end | |
end | |
end |
Now if you start server localhost:3000 you should redirect to Okta login screen like below.
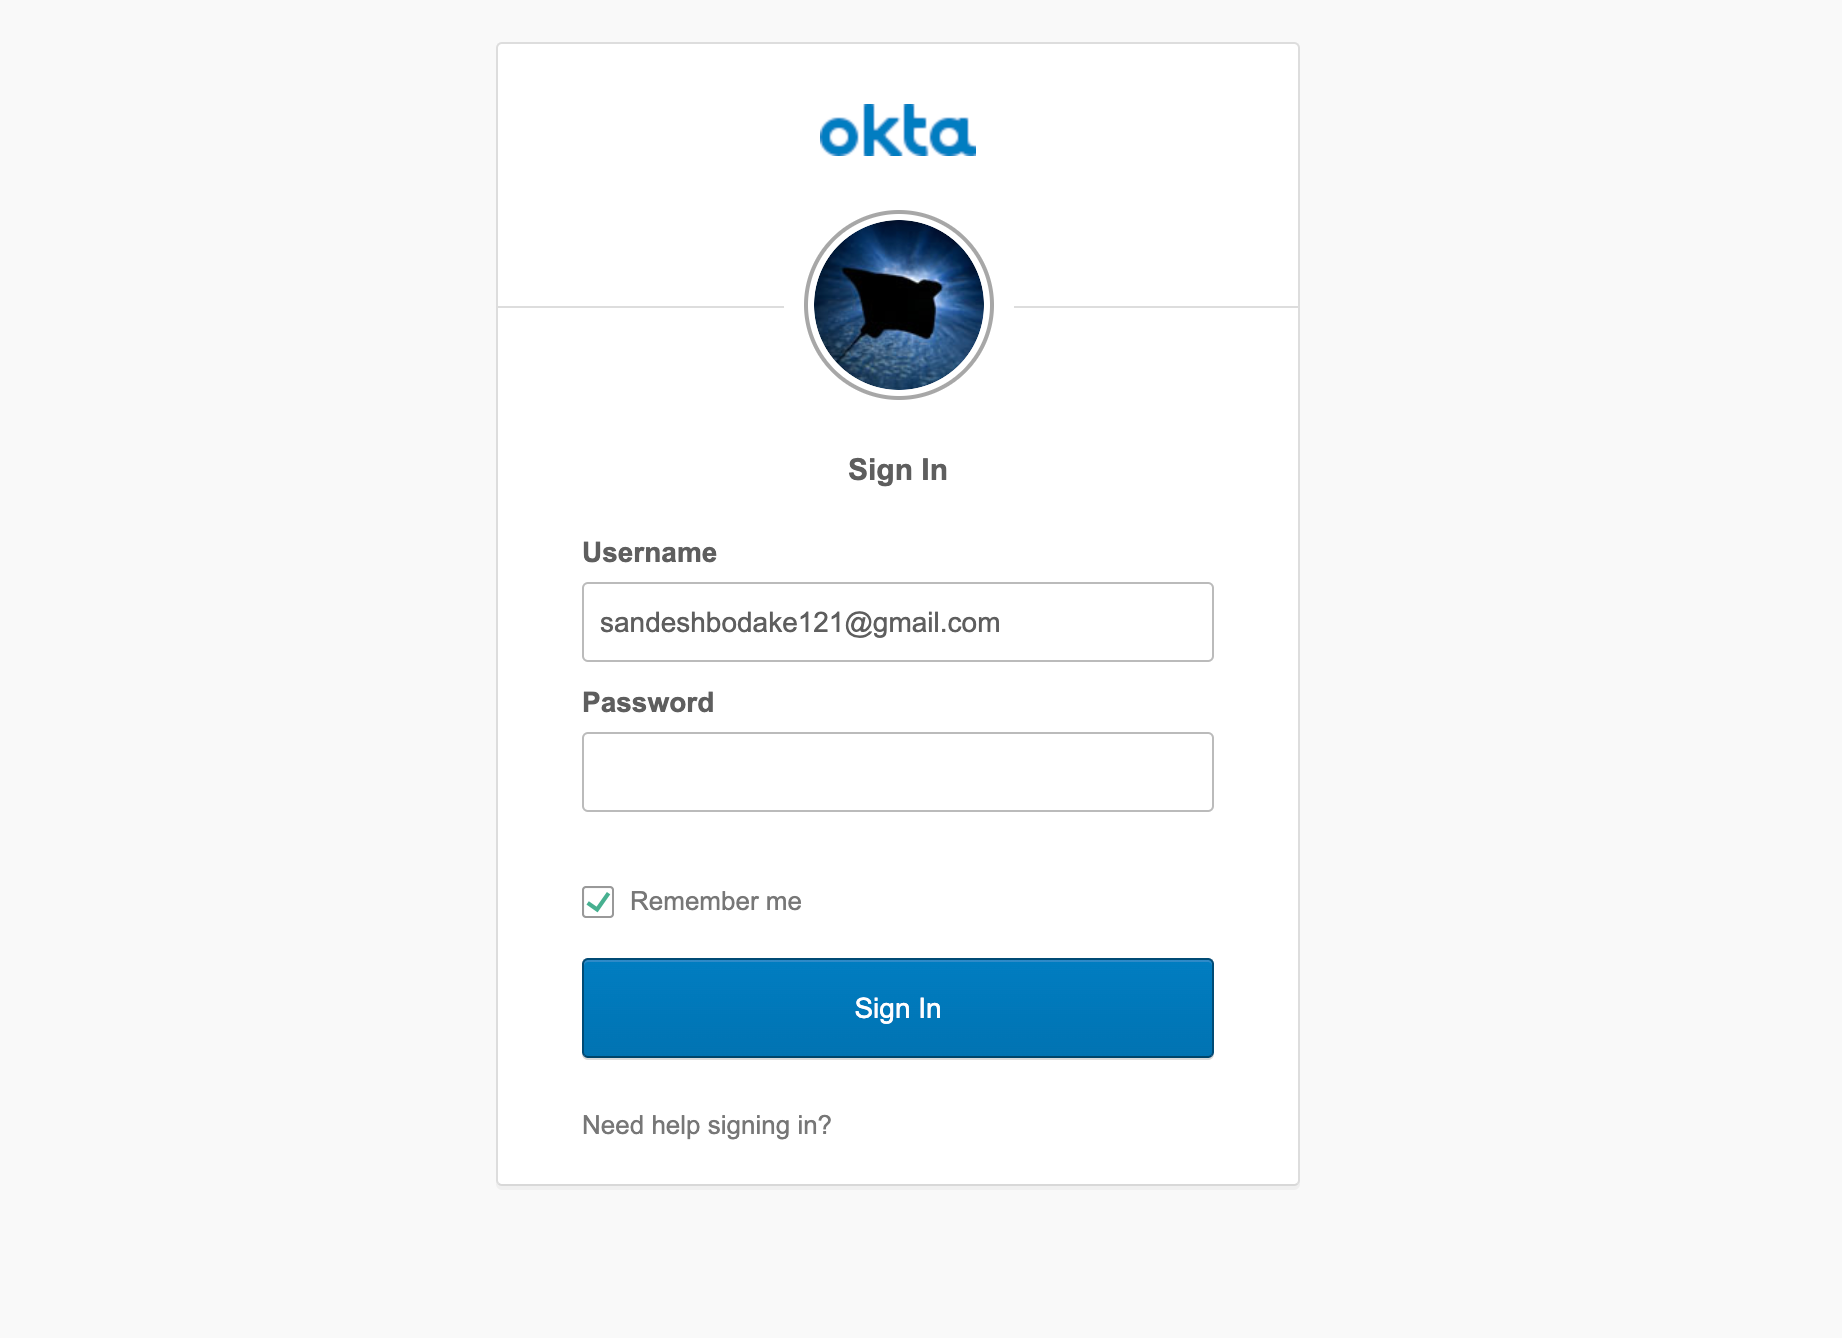
After login, it’ll redirect to OKTA_REDIRECT_URI and the session will be created.
We have successfully implemented Okta with Devise Gem. If you lost somewhere please refer my GitHub repo here
At Scalereal We believe in Sharing and Open Source.
So, If you found this helpful please give some claps 👏 and share it with everyone.
Sharing is Caring!
Thank you ;)