
How to upload or list files from the s3 bucket using okta credentials.
We’ll be integrating okta, SPA, and AWS. I have built an app that uses okta open id connect to authenticate and access s3 bucket resources.
Background
For one of our client projects at ScaleReal, We used Okta for authentication and authorization. We came across a use case where we wanted to upload files to S3 buckets securely, Allowing only authenticated users to upload the files. After doing some research we learned that there are two ways we can handle it
- Let the backend handle the authentication and upload by creating the REST API
- the frontend handle the upload without involving the backend. We chose the latter one.
Prerequisites
To implement this we will need the following:
An Open ID Connect app in okta (for now we’ll be using a developer account).
An AWS S3 bucket, If you don’t have an account you can get started with the trial account.
Creating Web App in Okta
The first task is to create the web app in Okta and get the Client Id (sometimes referred it as ‘audience’) and Okta org URL (Auth issuer).
Please follow the below steps to create the web app in okta:
- Log in / sign up to okta org.
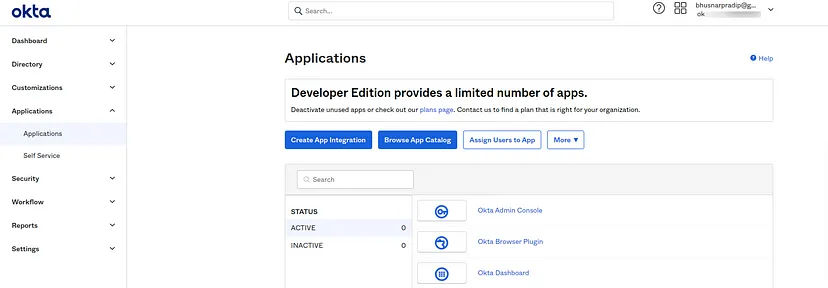
- Select the Applications > Applications section on the right sidebar of the screen.
- Click on Create App Integration
- Select the Sign-In method as OIDC — OpenID Connect and the application type as Single-Page Application.
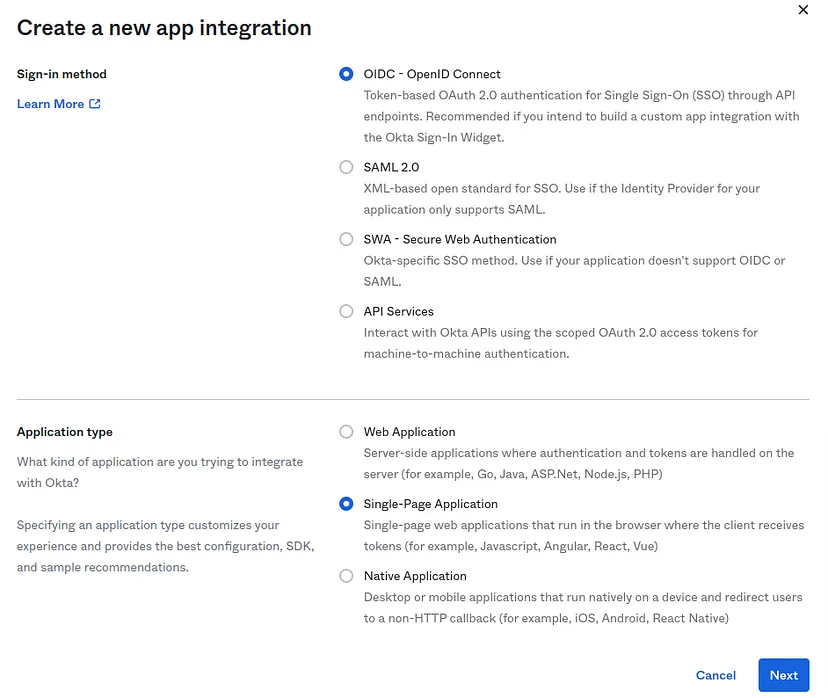
- Click on the next button it will redirect to New Single-Page App Integration screen.
- Add App integration name
- Select Grant type as Authorization Code and Refresh Token
- Add Sign-in redirect URIs ( eg. http://localhost:8080/login/callback ) and Sign-out redirect URIs ( eg. http://localhost:8080/login )
- Add Trusted Origins ( eg. http://localhost:8080 )
- Add Controlled access as per your need.
- Click on the save button.

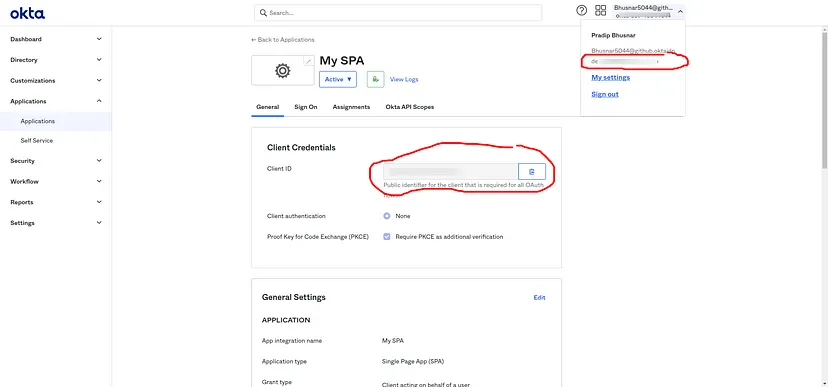
- Make note of your Client ID and Okta org URL (Auth issuer)
Integrating okta with React App
Please follow the below steps to integrate your Single Page Application
Create your react app
Add packages
yarn add @okta/[email protected] @okta/[email protected]
- Add login component and wrap the component withOktaAuth to get access to oktaAuth and authState props. Using these props we can sign in to the application and can check the authentication status of our app. Also, we can restrict the login route.
I have added the login component snippet below you can refer to.
Create a landing screen for your app (eg. Dashboard).
Add routes setup and configure the okta
To configure the okta with the app we require information from the app integration that we created earlier to configure communication with the API: Client ID and Issuer. The Okta React SDK requires an instance of an OktaAuth object with configuration properties. You need to set the clientId and issuer .
Note: create .env file with APP_CLIENT_ID, and AUTH_ISSUER (should be your Okta org URL eg. ‘https://example.okta.com’)
I have added the configuration in the routes file, you can refer to below code snippet.
- Add logout and get profile info
The okta react sdk provides the useOktaAuth hook which provides oktaAuth and authState variables. These are used to sign out the user and also to get the claim details which include profile info and other details.
Integrating okta with AWS
Create an Amazon S3 bucket and configure CORS
- Go to the Amazon S3 console
- Select the existing bucket or create a new bucket. Note the bucket name and region for later use.
- Go into the bucket and open the Permission section, and click Edit CORS Configuration
Copy the below JSON and paste it into the edit box and save the changes You can expose the file metadata info that you passed with the file in the ExposeHeaders section.
Create an IAM OpenID Connect Provider
- Go to the IAM console and click the Add Provider button, select OpenID Connect, enter your Okta org URL as the Provider URL ( e.g. https://example.okta.com ), and click on Get thumbprint. Enter your Okta app Client ID as the Audience, and click Add Provider button. This will create a new identity provider and this will help to manage your user identities outside of AWS.
Create an IAM Role and Assign Users Logged in through Okta
- Go to the Policies section of the IAM console and click Create Policy button to create a new policy.
- Switch to the JSON tab and add the below JSON. Please make sure you replace the YOUR_BUCKET_NAME and YOUR_OIDC_PROVIDER_URL from the JSON.
- Click on Next and add the name for your policy (e.g. okta-policy) and finally, click on Create policy button.
- Now go to the Roles section of the IAM console and click Create Role to create a new role.
- Select the trusted entity type as Web identity, and select your okta org from the Identity provider drop-down list. Then select the audience from the drop-down. And click on the Next button.
- On the Add Permission (Attach Policy) step, select the policy you just created (e.g. okta-policy), and click Next Step.
- Add role name, edit select trusted entities, and add the below JSON then click on Create Role button.
- Use the JSON below for policy.
Make sure that you replace YOUR_BUCKET_NAME and YOUR_OIDC_PROVIDER_URL in the policy.
Important: make sure you not down the ARN from role summary. Then bucket region, bucket name Those will be used as AWS_ROLE_ARN , AWS_REGION and AWS_S3_BUCKET_NAME .
Let’s get started with the operations.
Libraries Used
@aws-sdk/client-s3
@aws-sdk/credential-providers
Create Credential and S3 Client
To create or assume credentials for S3Client object we use fromWebToken method from @aws-sdk/credential-providers which accepts objects containing roleArn and webIdentityToken.
Credentials and roles are assumed for users using the application so that file upload can be directly done without telling AWS user’s details
To create an S3 client object We use S3Client method from @aws-sdk/client-s3 which accepts objects containing region and credentials.
S3Client object can be used for uploading, deleting and listing, and many other operations in an S3 bucket.
File Upload
We can utilize the S3Client object created above for file upload, using the S3Client.send command which accepts a fileObject
A file object is created using the PutObjectCommand which takes an object as the argument. The object must contain
- Bucket - bucket name
- Key - file name and can be folders if it includes /
- ContentType - file type
- ACL - access control list
- Body - file to be uploaded, can be a string, buffer
- Metadata - object to add custom metadata for the file
File Listing
For file listing we use ListObjectsV2Command, there is also another command ListObjectsCommand for listing. ListObjectsV2Command is the newer version command. which provides up to 1000 objects with each request. To perform this operation we require read access permission to the bucket.
You can refer to ListObjectV2Command for details of the input and output object
For our use case, we used the S3 bucket name to fetch records from it, you can see the code below
Accessing the Metadata of Each File
To read the metadata of each object we use HeadObjectCommand, this command is helpful only when we are interested in object metadata. This action requires read access permissions to the object.
To perform this action we also need to add CORS configurations to the bucket. In the CORS configuration, you will need to add object metadata keys that are required from the objects you can refer to the CORS JSON mentioned in this section.
You can refer to HeadObjectCommand for more details about input parameters and response.
You can generally pass Bucket(the bucket name ) and Key(Object/resource Key) that you want to access.
We are only interested in the Metadata of the object and that’s why we are extracting it from the response
const { Metadata } = await s3Client.send(command);
For accessing details apart from Metadata you may need to check your S3 bucket roles and permissions
For the Head response, you will not get any response body. If you are checking the network section for debugging, you will not find any response body but the data is present in response headers.
Error Messages
- If the object does not exist then it will return 404 (“no such key”)
- If the user accessing the S3 object does not have permission then it will return 403 (“access denied”)
Conclusion
So far we have learned how to create an Open Id connect app in okta, integrate okta in Single Page Application using Client Id and okta organization URL(Auth issuer), integrate okta with AWS by creating new policies and roles, Integrate AWS with react application to upload/ list files from s3 bucket using okta credentials.
We have built an app that includes end-to-end integration. You can take a reference from this application.
The source code for this tutorial is available here: https://github.com/scalereal/okta-aws-react-app
At Scalereal We believe in Sharing and Open Source.
So, If you found this helpful please give some claps 👏 and share it with everyone.
Sharing is Caring!
Thank you ;)