
How to create PWA apps with React for specific screens or routes or dynamic routes.
In this article, we are going to learn what is PWA, how to create a PWA app with react using CRA, how we can transform react app built on webpack/vite to PWA, then we’ll look into how we can create PWA for specific screens, routes, or dynamic routes.
What is Progressive Web App (PWA)?
A Progressive Web App(PWA) is a more dynamic web application that can run standalone. These apps are developed using specific technologies and standard patterns to allow them to take advantage of both web and native app features. For example, web apps are more discoverable than native apps, it’s a lot easier and faster to visit a website than to install an application, and you can also share web apps by sending a link. It can be accessed over the web but also surface on the home screen of your Android or iOS device.
Progressive Web Apps (PWA) are built and enhanced with modern APIs to deliver enhanced capabilities, reliability, and installability.
PWA offers benefits such as:
- performance
- the ability to work with or without an internet connection;
- platform-specific; and,
- installable.
Create a React App with the Progressive Web App Template
To create our PWA, we’re going to use Create React App. This excellent project has long had inbuilt support for making PWAs.
From Create upwards, it is possible to create a /src/serviceWorker.js to benefit from the inbuilt support for Workbox’s InjectManifest plugins, which will compile our service workers and inject the URLs for pre-caching. The easiest way to get started creating a new PWA is to use one of the custom templates offered by Facebook using Create React App command.
Let’s build the PWA starter app by running the following command:Create a React App with the Progressive Web App Template
npx create-react-app pwa-react-typescript --template cra-template-pwa-typescript
The above command can be broken down as follows:
- create-react-app: This command initiates the popular Create React App utility that helps to build the starter app.
- name-of-our-PWA-app: This is the name of our application. You can name the app whatever you would like to.
- — template: This is an argument, using this you can specify a specific template for our starter react application.
- cra-template-pwa: The name of the PWA template for your PWA react application.
This command will build your starter PWA React application. After the successful creation of the starter app, there are a few files that we shall pay attention to when it comes to PWA:
- service-worker.js: This is a script that runs in the background once your application starts running. The service worker makes sure that you can use your React application offline and handle multiple requests for the UI. (learn more here)
- manifest.json: This is basically a configuration file that tells the browser about your web application. this is essentially the metadata about the app. It can determine things such as icons, names, and colors to use when the application is displayed.
- serviceWorkerRegistration.js: This file tells whether or not your service worker was successfully registered.
Our starter app setup is done. We can test it using the following command:
yarn start

or

npm start
You can add some functionality to the app ex. Counter component.
In order to opt-in to the offline-first behavior, we should look for the following in their src/index.js file:
// If you want your app to work offline and load faster, you can change
// unregister() to register() below. Note this comes with some pitfalls.
// Learn more about service workers: https://cra.link/PWA
serviceWorkerRegistration.unregister();
As the comment states, switching serviceWorker.unregister() to serviceWorker.register() will opt you into using the service worker, a key benefit when it comes to PWAs. Check Google’s explanation on this for more information: https://developers.google.com/web/fundamentals/primers/service-workers/registration
With the PWA files setup, in order to view the difference, we can deploy the application to a static server using the serve package. You can now build the application, and can use the following command to install, build and deploy the application:
npm install serve
npm run build
serve -s build //if you encounter an error with this command, try 'npx serve -s build'
You should see the message in your terminal, having your application deployed to http://localhost:5000. If you are using VS Code Ctrl+click will open the application in a browser.
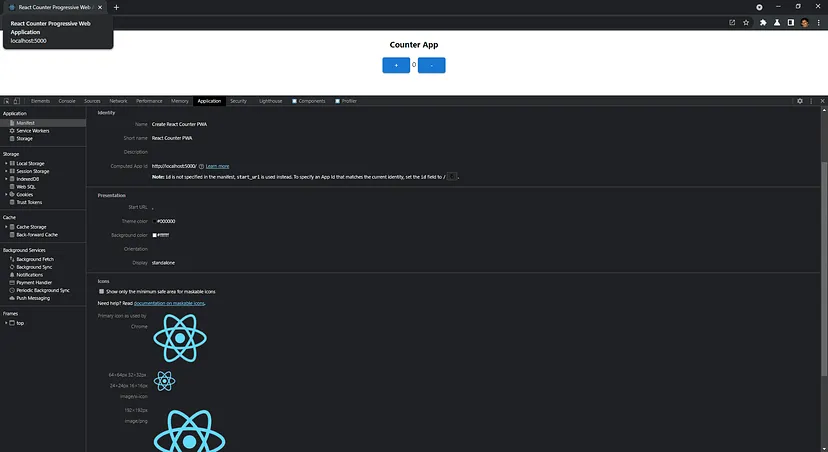
To check more details about the PWA, please open the dev tools (for Google Chrome, entering F12 opens the Dev Tools). Under the Application tab, on the left side, you should see a Service Workers section. Here we can check service-worker.js the file and is activated/running. In the Manifest section, we can check the PWA details that got added by the CRA template setup.
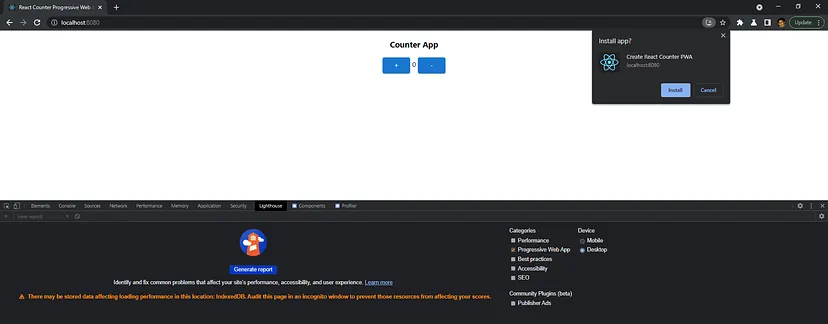
With your PWA app running using React, we’ve successfully built our first PWA React application! From here, you can test many PWA features, such as installation, offline viewing, and Lighthouse audit testing.
Customizing the PWA with React
Open the index.html replace the title <title>React App</title> with <title>React PWA</title>. You can give any suitable name to your app.
Next, open up manifest.json and replace the following:
"short_name": "React App",
"name": "Create React App Sample",
With this:
"short_name": "React PWA",
"name": "React PWA",
You can modify other metadata or can use the below properties (and others not yet configured) to control how your app behaves. Here’s what it should look like right now:
{
  "short_name": "My PWA",
  "name": "My PWA",
  "icons": [
    {
      "src": "favicon.ico",
      "sizes": "64x64 32x32 24x24 16x16",
      "type": "image/x-icon"
    },
    {
      "src": "logo192.png",
      "type": "image/png",
      "sizes": "192x192"
    },
    {
      "src": "logo512.png",
      "type": "image/png",
      "sizes": "512x512"
    }
  ],
  "start_url": ".",
  "display": "standalone",
  "theme_color": "#000000",
  "background_color": "#ffffff"
}
When a user adds a web app to their home screen using Chrome or Firefox on Android, the metadata in manifest.json determines what icons, names, and branding colors to use when the web app is displayed.
The Web App Manifest guide provides more context about what each field means, and how your customizations will affect your users’ experience.
Transform React App Build On Webpack to PWA
Create the manifest.json file in the public folder, and add all the required properties. Then embed the manifest file index.html using the link, add the below line of code in the <head /> tag:
<link rel="manifest" href="/manifest.json" />
To generate the Service Worker, we will have to add webpack’s Workbox plugin in our webpack.config.js file.
npm install workbox-webpack-plugin --save-dev
Then, in your webpack.config.js, add the following lines of code that start with a +:
const path = require('path');
  const CopyPlugin = require('copy-webpack-plugin');
  const HtmlWebpackPlugin = require('html-webpack-plugin');
  const { CleanWebpackPlugin } = require('clean-webpack-plugin');
  const TsconfigPathsPlugin = require('tsconfig-paths-webpack-plugin');
+ const WorkboxPlugin = require('workbox-webpack-plugin');

  const PACKAGE_ROOT_PATH = process.cwd(),
  SRC = path.resolve(PACKAGE_ROOT_PATH, './src'),
  DIST = path.resolve(PACKAGE_ROOT_PATH, './dist'),
  PUBLIC = path.resolve(PACKAGE_ROOT_PATH, './public'),
  INDEX_HTML = path.resolve(PACKAGE_ROOT_PATH, './public/index.html');

  module.exports = {
    ...
    plugins: [
      new CleanWebpackPlugin(),
      new HtmlWebpackPlugin({
 -      title: 'Output Management',
 +      title: 'Progressive Web Application',
        template: INDEX_HTML,
        minify: {
            collapseWhitespace: true,
            removeComments: true
        }
      }),
 +    new WorkboxPlugin.GenerateSW({
 +     // these options encourage the ServiceWorkers to get in there fast
 +      // and not allow any straggling "old" SWs to hang around
 +      clientsClaim: true,
 +      skipWaiting: true,
 +    }),
      new CopyPlugin({
            patterns: [
                {
                    from: PUBLIC,
                    to: DIST,
                    globOptions: {
                        ignore: ['**/index.html']
                    }
                }
            ]
       }),
    ],
  };
With the above addition, it will generate the Service Worker, and also expose the manifest file so that it can be accessed by the web browser.
When we run: npm build or yarn build in the project terminal:
...
             index.html  254 bytes          [emitted]
precache-manifest.b5ca1c555e832d6fbf9462efd29d27eb.js  268 bytes          [emitted]
      service-worker.js       1 kB          [emitted]
...
We can see, we now have 2 extra files being generated; service-worker.js and the more verbose precache-manifest.b5ca1c555e832d6fbf9462efd29d27eb.js. service-worker.js is the Service Worker file and precache-manifest.b5ca1c555e832d6fbf9462efd29d27eb.js is a file that service-worker.js requires so it can run.
Register Your Service Worker
Open the index.js file which is the entry point of our app, add the following codes to register the Service Worker.
import React from 'react';
  import ReactDom from 'react-dom';
  import App from './App';

  ReactDom.render(<App />, document.getElementById('root'));

+ if ('serviceWorker' in navigator) {
+   window.addEventListener('load', () => {
+     navigator.serviceWorker.register('/service-worker.js')
+    .then(registration => {
+       console.log('SW registered: ', registration);
+     }).catch(registrationError => {
+       console.log('SW registration failed: ', registrationError);
+     });
+   });
+ }
At this point, we have successfully generated and registered a Service Worker for the background activities on the browser. Once more run thenpm run build to build a version of the app including the registration code. Now we can run our app to see the beauty of a PWA. You can serve the build using the following command:
npx serve -s build
or
npx serve -s dist
Customize PWA to work on only specific screens or Routes
To achieve this we will mainly interact withmanifest.json file. If you check the properties of the manifest.json , there is a property called start_url .
start_url
The start_url tells the browser where the application should start when it is launched, and also it prevents the app from starting on whatever page the user was on when they added the app to their home screen. It is used to direct the user straight into that location.
Suppose you have added a URL as"start_url": "/apps/counter-app” , also you have other routes ex. / ,/dashbord and /apps . In this case, the user will be directed to the /apps/counter-app once they open the app. Think about what the user will want to do once they open the app, and place them there.
Go to the manifest.json which is present in the public folder, edit the line "start_url": ".” and replace ".” it with the URL that you want.
{
  ...
  "start_url": "/apps/counter-app",
  ...
}
This will show the PWA download icon on specific screens or routes only. In this case, the PWA download icon will be shown when the user goes to the /apps/counter-app location.

Show the PWA download icon on the dynamic route
Whenever the browser reads the manifest.json file and If it reads the start_url , it shows the download icon on the right side of the browser URL on that provided location. By default, it will show it on the landing screen of the app which refers to the "start_url: “.”
To change this behavior or to show this icon only on specific screens or routes, we will need to do little changes in the manifest file. Remove the "start_url: “.”, line from the manifest.json file, and add the id in the link tag. Later we will use that id to modify the JSON content.
<link rel="manifest" id="manifest-id" href="/manifest.json" />
Once that is done, now we need to embed the manifest file dynamically when that specific screen renders with the updated properties.
Suppose you want to show the PWA feat or PWA download icon on /apps/counter-app this route, then you need to attach manifest.json file in the index on CouterAppPage component. Add the following lines in the component. That will do the work.
export const CouterAppPage:FC = () => {
  ...
  const manifestData = {
      short_name: 'Counter App',
      name: `Counter PWA`,
      icons: [
          {
              src: `${window.location.protocol}//${window.location.host}/images/android-chrome-512x512.png`,
              sizes: '512x512',
              type: 'image/png'
          },
          {
              src: `${window.location.protocol}//${window.location.host}/images/android-chrome-192x192.png`,
              sizes: '192x192',
              type: 'image/png'
          }
      ],
      start_url: window?.location.href || '',
      display: 'standalone',
      theme_color: '#aaffaa',
      background_color: '#ffffff'
  },
  manifestContent = encodeURIComponent(JSON.stringify(manifestData)),
  manifestUrl = `data:application/manifest+json,${manifestContent}`;

  useEffect(() => {
        const linkTag = document.getElementById('manifest-id') as HTMLLinkElement;
        if (manifestUrl && linkTag) linkTag.href = manifestUrl;
    }, [manifestUrl]);
  ...
};
Note: Don’t forget to replace the manifestData content with your app content.
If your application routes are dynamic, suppose your appending dynamic id into the route URL, even in that case the above lines of code will work. Because we are adding window.location.href , this will add the current URL. Only we need to pay attention to the PWA names and icons that we need to change based on the dynamic route.
With this in place, your app is now ready to run. Once more build your application and serve by using the serve -s build command. Now you can test the application, and go to that route for which we dynamically attached the manifest, once you redirect to that router you will see the download PWA icon will appear in the URL. By clicking on it you can download the application and test it out on a desktop or ios device.
Transform React App Build On Vite to PWA
To transform the application to PWA we’ll require vite-plugin-pwa , this will help you add PWA with almost zero configuration. The plugin will add default configurations for common use cases:
- generate the Web App Manifest: using the manifest plugin option
- configure the Web App Manifest on your application entry point: adding a link on the head on your entry point
- generate the service worker: using the strategies plugin option (for more information read Service Worker Strategies section)
- generate the script to register the service worker in the browser: using injectRegister plugin option (for more information read Register Service Worker section)
To install the vite-plugin-pwa plugin use the below command:
yarn add vite-plugin-pwa -D
Edit your vite.config.js / vite.config.ts file and add the vite-plugin-pwa:
import { VitePWA } from 'vite-plugin-pwa'
export default defineConfig({
  plugins: [
    VitePWA({
      registerType: 'autoUpdate',
      /* if you are using vite-plugin-pwa plugin version prior to 0.12.2
        add below lines to fix injectRegister bug.
      */
      workbox: {
        clientsClaim: true,
        skipWaiting: true
      },
      /* If you want to check it on dev, add devOptions.
      */
      devOptions: {
        enabled: true
      }
    })
  ]
})
by adding above lines, your application is now able to generate the Web App Manifest and inject it at the entry point, generate the service worker and register it in the browser. Please refer types.ts file for more information on vite-plugin-pwa configurations.
vite-plugin-pwaplugin uses workbox-build node library to build the service worker, you can find more information in the Service Worker Strategies And Behaviors and Workbox sections.
Conclusion
So far we have learned about what is PWA, how we can setup PWA with react using CRA templates, customize the PWA by modifying manifest.json file, transforming react app build with webpack/vite to PWA, how to config webpack for generating service-worker, and customization of PWA to work on specific screens or routes.
At Scalereal We believe in Sharing and Open Source.
So, If you found this helpful please give some claps 👏 and share it with everyone.
Sharing is Caring!
Thank you ;)